by John Glynn | Dec 15, 2016 | Classic Porsche Blog, Race and Rally
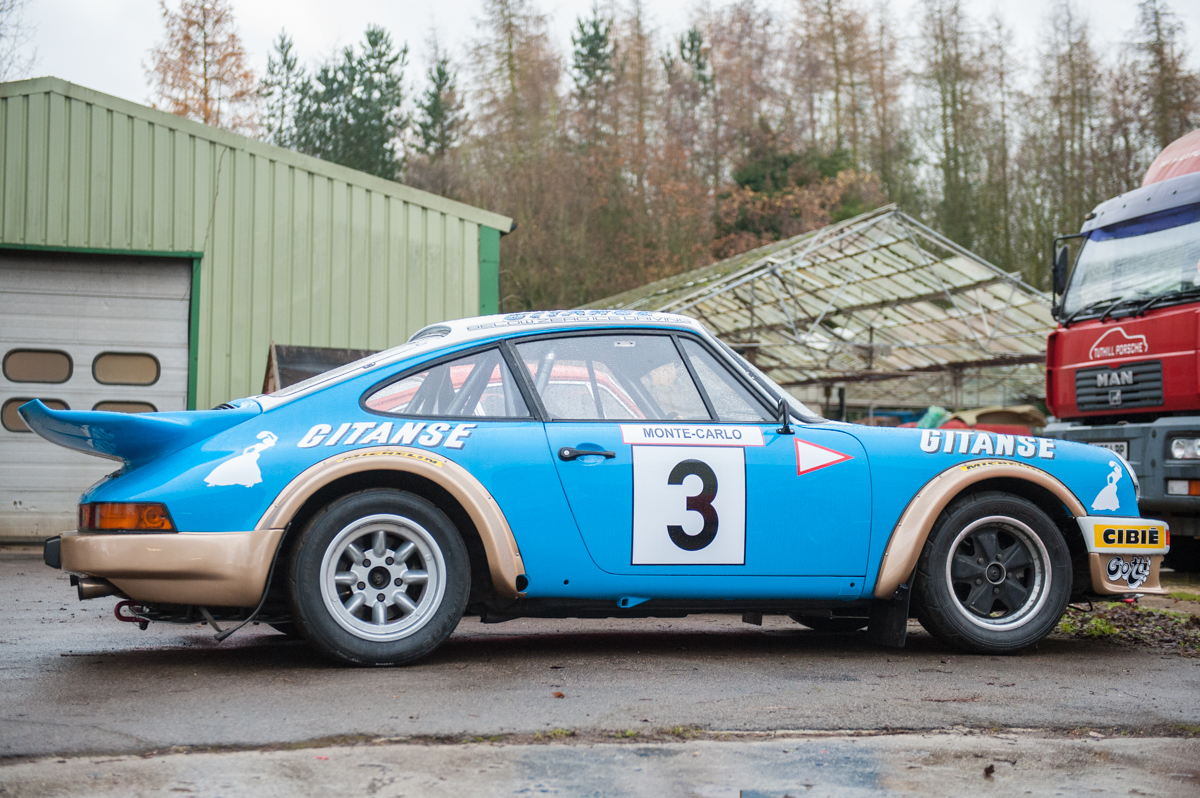
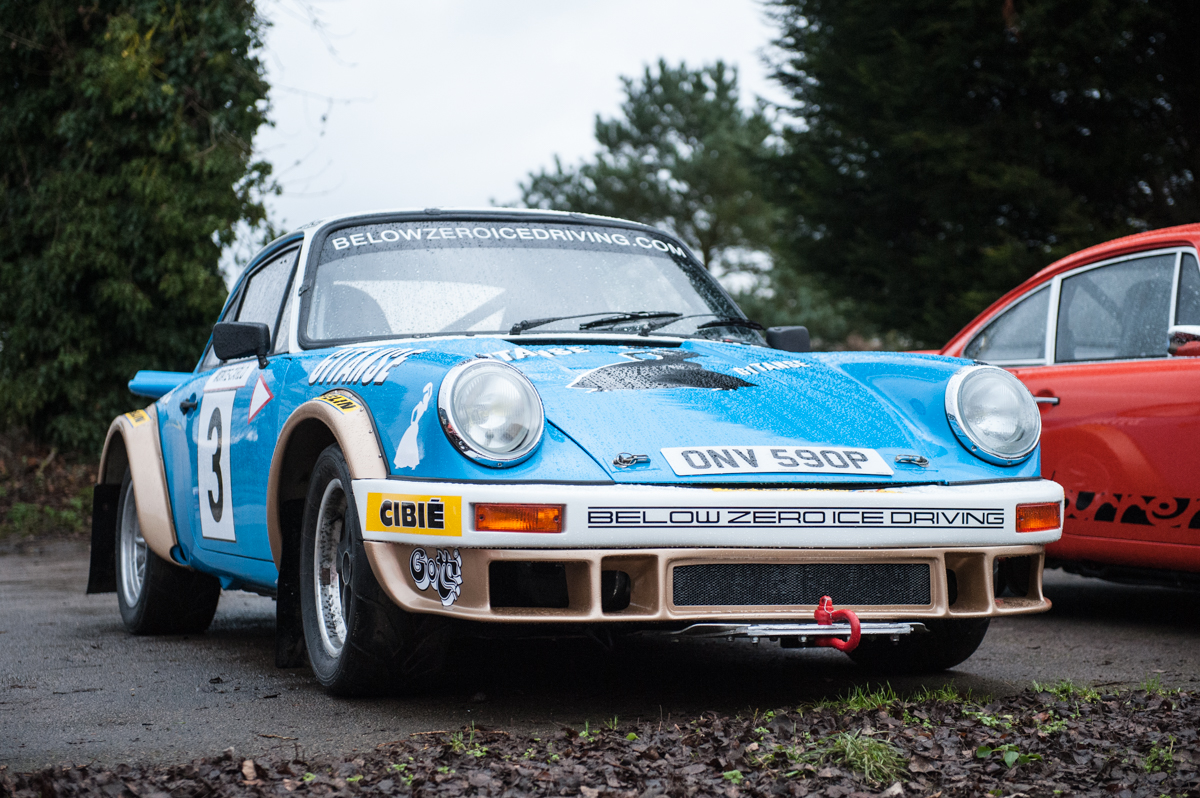
My friend Simon Kelly has just had his Porsche 911 SC repainted by Tuthills in a cool Alméras Frères tribute livery. I managed to get a few pics of the finished item before jumping on the plane to Gran Canaria.
Almeras won the 1978 Monte Carlo Rally with an SC in the famous Blue and Gold ‘Gitanes’ cigarettes livery: probably the high point of the SC’s motorsport career. Tobacco advertising is a sensitive topic in Europe nowadays and many owners modify tribute livery branding slightly, to ensure their cars do not fall foul of any rules. Simon also tweaked the design of his decals a bit, to be sure the livery would not upset the wrong people.

“I wasn’t quite sure what I would do regarding the tobacco thing and, in the end, I had a last-minute wobble. I did some reading about it and it’s a grey area with governing bodies, regulators and the media all having a different take on what’s acceptable. I didn’t want the tobacco ban causing problems for the car, so for a quite life I used the French spelling of ‘gypsy’ instead of the Catalan.

“The decals were made by our mutual friend, Rick Cannell at Highgate House, and are a lovely job. Rick made them the same way as the originals would have been done, using layered vinyl and not the printed vinyl which is more common nowadays. Your photos remind me that I need to send Tuthills some new number plates I had made in the proper style!”

Regular readers may recognise Simon’s car as one I did a feature on back in the day, when it was painted grey and red. Built by Tuthills using one of EB Motorsport’s first Group 4 Almeras-style arch kits, Simon bought the car in 2011, selling an RSR replica and 968 Sport to buy this one instead.
The car has been a regular at the Below Zero Ice Driving camp in Sweden every winter and is heading back again for 2017, hence the font and rear guards and towing eyes, to drag it off the snow banks. I think this is going to look great on a white background – here’s to taking many more pics!

by John Glynn | Nov 13, 2016 | Classic Porsche Blog, Modified Porsche Hot Rods
I’ve been a bit of an air-cooled 911 accessories shopping guide of late! My friends at KW Suspension in Germany have just released a new suspension kit (and reminded me of an older one) for impact-bumper Porsche 911 models and I promised I would share.

The first kit is an adjustable damper upgrade for G-model 911s which works with the torsion bar system. Part of the KW Suspension “Classic Range”, this KW Variant 3 setup is a complete car set of compression and rebound adjustable shock absorbers. The kit does not require a conversion to coilovers, but instead retains the car’s torsion bar system. The mild steel damper bodies are galvanised for longer life.

KW Suspension Coilovers for Torsion Bar Delete
Further up the price scale is the Clubsport 2-way coilover kit, which allows torsion bar deletion. KW recommends this lighter system with aluminium damper bodies primarily for motorsport use, but check your competition regs carefully before committing to the spend. Supplied with adjustable aluminium monoball front top mounts, the upside-down front dampers are adjustable for both rebound and compression.
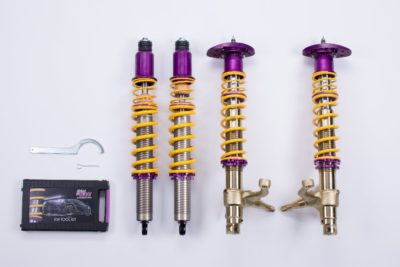
Rebound is adjusted at the piston rod end and provides sixteen clicks of adjustment. Compression adjustment is carried out via a 12-position adjuster on the upper damper housing. “Increased rebound forces ensure tighter handling and a significantly reduced rolling of the body,” say KW. “At very high speeds, the steering precision is improved at the driving dynamic limit, while on the uneven and wavy road surfaces, a lower rebound stage is advantageous.”

Both kits are TUV approved for use on the roads. The Variant 3 kit costs £2062 plus VAT in the UK and is available from KW dealers. No price on the 2-ways: I expect you might need to be sitting down for that one 😀
by John Glynn | Jul 16, 2016 | Porsche Cayenne, Project Cars
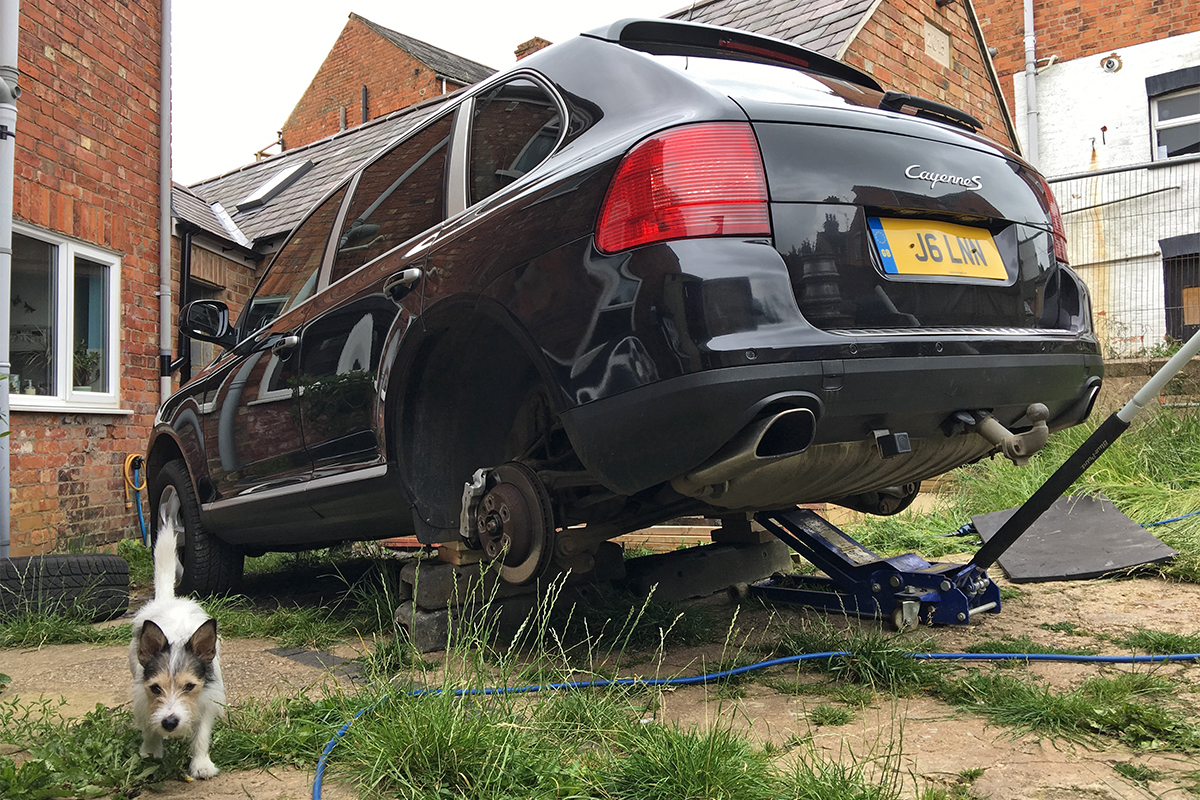
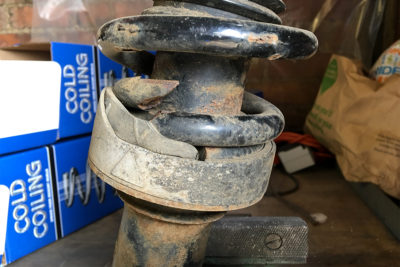
Shakespeare once wrote that “the course of true love never did run smooth”. The timeless wisdom of this observation was proven yet again today, when I tackled a Porsche Cayenne rear spring replacement on my 2004 V8 Cayenne S: a.k.a. The Big Pig.
I took the Cayenne for MOT (annual safety inspection) last week and it was en route to passing with flying colours, until we got to the back end, where one spring had a cracked coil. Instant fail. I priced up genuine Porsche springs at £200 each plus the VAT, or Kilen springs made in Sweden from an eBay seller (the worryingly named “Octane Motorstore”) at £65 delivered for a pair. I wanted to change the pair of rear springs, so £400 versus £65 was a no brainer.

The Cayenne has now clocked up 159,000 miles, with 42k of those in my ownership. Despite all the grief that this high maintenance German car has caused compared to my six previous trouble-free Subaru Legacy station wagons, I’m still quite keen on it, so I do like to keep it working properly and do as much of the work as I can myself.
Rear spring repacement is a pretty easy job on these: the hardest part is finding the time and a dry day to do the work, and jacking the Cayenne up to get underneath it. Working on this thing on the ground is a pain in the arse as it is so heavy. I go with a belt and braces approach to supporting the car as I am always working on my own. You are not coming out in one normal-size piece if it slips off a jackstand while you’re underneath it, so I use substantial (heavy) underpinnings.

Eventually I got it up in the air, well supported with the rear wheels off and sized up the job. The rear suspension looks complicated, but it’s pretty simple: Pelican Parts has a great how-to on removing the rear suspension. The spring and damper assembly is a complete strut just like the front, so, once the anti-roll bar droplink is out of the way and the bottom shock nut is off, you just undo the four bolts holding the top mount to the chassis and drop the whole thing out. Then it’s easy enough to get spring compressors on the strut and break it all down into component pieces.
Everything went smoothly enough. Undoing the strut top bolts was a mother of a job but, with a mishmash of extensions and breaker bars, they all eventually came undone. Taking it apart was easy (another win for air tools), but of course my doubts about the eBay springs were well founded: completely the wrong size and shape. They’ve got to go back and the dubious seller is being pretty tight about paying for the return, even though they sent the wrong parts. I had a strong feeling that it was all too good to be true.

There are very few affordable options for uprated damper & spring kits on Cayennes, so to give myself more time to research what is out there and get the car back on the road in the meantime, I ordered a low mileage used rear strut assembly from a breaker friend of mine and will put that on to get the Cayenne through the MOT.
While I have the thing up in the air, I pulled the rear bumper, relocated the LPG filling point on to the chassis, jet washed everything and sprayed it all with some rustproofing wax.

by John Glynn | Jun 26, 2016 | Classic Porsche Blog, Modified Porsche Hot Rods
Yorkshire’s EB Motorsport has unveiled its latest product: a perfect reproduction of the hard-to-find 5.5 x 15-inch Fuchs alloy wheel, now mandatory on all 2-litre 911s seeking an FIA Historic Technical Passport under Appendix K regulations.
These iPhone photos show the wheels painted to sample for a customer’s 2-litre 1965 911 race car, but they are available from EB Motorsport in a range of finishes. Manufactured to the same high standards as EB’s existing Fuchs reproductions in 9-inch and 11-inch x 15, and the well-known EB Deep 6 and 7R Fuchs rims, the front is CNC machined from billet aluminium, with the barrel laser welded for optimum strength and accuracy.
EB’s Fuchs recreations are never the cheapest but, with SWB Porsche 911 race cars built to FIA Appendix K regulations now changing hands for as much as £200k in some cases, the cost of £900 per wheel for such a high quality product is perhaps not that shocking.
“Our manufacturing process uses the highest quality materials and requires expensive machinery to carry out the machining and laser welding operations,” says EB’s Mark Bates. “The advantage of this investment is a strong wheel that has much a higher reliability than cheap cast wheels, which can fracture and fail. I would much rather have an EB wheel under me when at full throttle down the Kemmel Straight at Spa.”
EB Motorsport 5.5 x 15-inch Fuchs
Unlike the original Fuchs wheels, the EB Motorsport 5.5-inch Fuchs are ready to accept modern tyres and valves, with machined tyre beads and properly machined holes for modern valves. They are also a perfect fit for the collapsible spare tyres on air-cooled Porsche 911s: I have a 5.5 x 15″ Fuchs wheel on the spare tyre for my 1976 Carrera 3.0. and it fits perfectly under the bonnet.
“Before we recreated these rare 5.5 x 15-inch Fuchs wheels, we were running inner tubes on fifty year-old wheels with who-knows-what history,” says Bates. “From a driver’s point of view, the stress factor is much reduced in using these wheels versus the originals.”
SHARE • EXPLORE • SUPPORT
Ferdinand blogs my freelance adventure with Porsche at the centre. To support the blog or engage with me in other ways, you can:
by John Glynn | Jun 14, 2016 | Porsche Cayenne, Project Cars
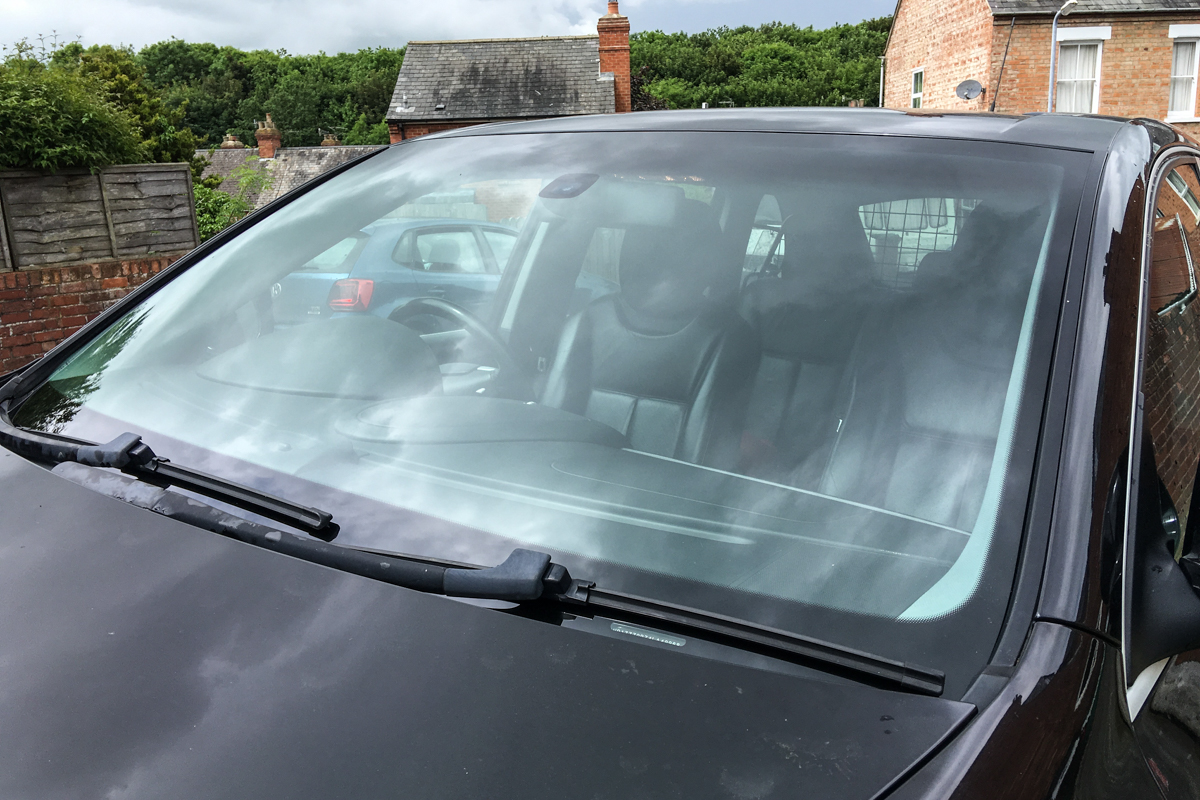
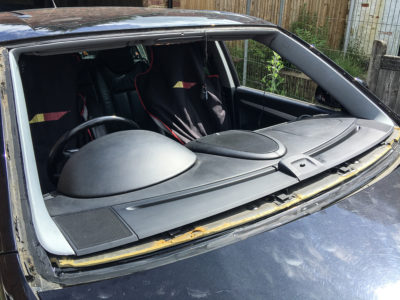
After 158,000 miles of chips and scratches and a recent heavy impact with a hefty crow, today it was time for my Porsche Cayenne to enjoy a windscreen replacement. My insurers have an agreement with Autoglass, so I set up an appointment and waited for the fitter to arrive.
The crow incident had cracked the screen from top to bottom, so it needed replacing. Having used some of the big windscreen removal companies a few times, and seen how their rush job fitters can make a bit of a hash of things, in the past I have bought the glass and bonding adhesive to do my own cars. However, this was a big bit of glass so not an easy one-man job, and the top tint and auto wiper sensor made the screen pretty expensive. Better to let the professionals do it, with a little bit of help to lift the glass in.
The Autoglass guy came early and took a bit of time deciding where best to carry out the work. Rain was on the way and he needed to line his van up perpendicular to the Porsche, to be able to use the side-mounted awning if needed. There was no space on the street to do this, so he decided to park the car just inside the gates on my soon-to-be-driveway, with the nose sticking out of the gates. We took a bit of time to get the Cayenne level and it all worked out OK.
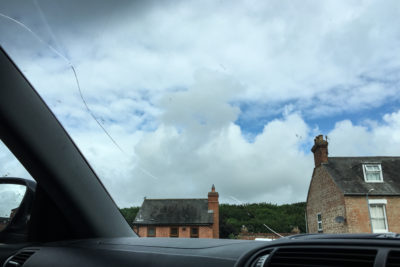
Ezi-Wire patented windscreen seal cutting tool
My last windscreen change was done by a local guy who cut the screen out of my Spec B Subaru Legacy estate using hand-held knife blades. He had to strip half the interior trim to do the job properly. The Cayenne’s windscreen replacement was made easier by the use of an ‘Ezi-Wire’ device mounted to the inside of the screen (above), which gently pulled a high tensile steel cable through the windscreen adhesive and made a very tidy job of it. Apparently the Ezi-Wire is an Autoglass/Carglass/Belron patented tool, so no wonder I hadn’t seen it before.
The Ezi-Wire uses a pair of winding spools, controlled by a hand ratchet. The twin spools cut from opposite directions and allow controlled “slip cutting”, which enables the cable to slice through the bonding seal rather than the seal having to be cut with a hard-to-control hand knife, so the work is much less risky. The Autoglass technician had a van full of tools, but reckoned the Ezi-Wire helped him do most jobs right first time, with no damage to the vehicle.
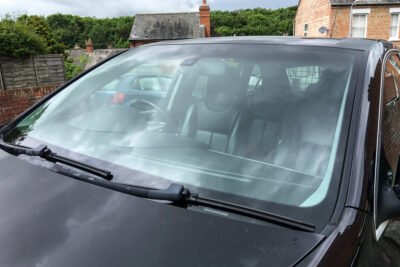
From start to finish, the whole thing took two hours including two cups of tea and plenty of chat. I am delighted with the finished product: you can’t beat a new windscreen to lift the driving experience. Also delighted that I had Dick’s thirty years of glass fitting experience here to do the work. I did find a small bit of surface rust in the top right corner of the Cayenne’s windscreen aperture, but I cleaned it up and ground the rust out before adding a bit of Kurust treatment. It was then finished with an anti-rust primer before the windscreen was fitted.