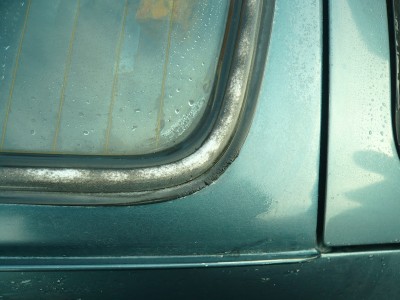
I’m changing the rear window/windscreen seal on my 1983 Porsche 91 SC Coupe. My last post left off at the point where I was just gearing up to take the rear screen out to replace the seal. This was the first time I had changed a rear screen seal in a 911 and it was interesting how it was all assembled. Here’s a shot of the old seal. Note the cracking and the lack of pooling in the corner: the water is running in instead of being held outside. Note also the interior condensation!
Having broken a 924 and a 944 for parts, I know how they are put together. I think the 24/44 series are tremendously heavy machines for what they are. When you start taking a 911 apart, the difference in construction is really obvious: FAR fewer heavy parts, and the parts that matter are really well thought out. The rear windscreen is one of those parts. “Glass is glass”, you might say. Not so, my friends.
Here’s a picture of how the headlining is held in tension at the lower rear corners. Simple, elegant and good for almost 30 years. Note the lack of a leak from the quarter glass. On original seals! Impressive. The other side has a tiny weep so I am changing that.
Taking the screen out is easy enough. It was freezing in the UK, so taking out the aluminium trim with the glass in situ was a bad idea with the rubber so cold – just asking for it to be bent. I decided to cut the screen rubber on the inside and push the glass out.
This is a pic of my first corner – you can see where I am slicing it. You need a sharp blade and a steady hand to keep your headlining intact. I went right around it taking care not to hit the headlining or the wires that run up either side of the glass, inside the rubber.
Rubber out, you can see how ‘in bits’ the rest of the car is. The trim is all out as I type this – nothing left in apart from the rear seatwell covers and I’m taking those out to check for rot.
Pulling out the sound deadening mat showed just what great condition the parcel shelf is in, no rot anywhere (unlike so many RHD UK cars). Here you can also see the DumDum sealing compound that Hayden explained to me last time we met. The compound is there to take up some of the slack in the corners, and support the rubber up top. Using a heat gun, I took the old stuff out and cleaned the old seal marks off the panel with Scotchbrite and thinners. I then replaced the DumDum with new.
Believe it or not, it took me about four hours to get the new seal fitted to the glass! I don’t have any pics of that to share but it went in a treat – with a little help from my faithful drag biking neighbour. Apart from the fact that a 30mm section of ally trim has popped out and refuses to go back in. I think I’ll have to take the screen out again to sort it.
The one consolation is that the new seal is doing its job – see below. I’d call that a result. Note just how much wider the fresh rubber is!


Great web site and useful info. I have a 1970 911 T with non sealing rear rubber and a rust bubble that will need repair. This sit will help. How did you fix the chrome popping out?
Hi Richard. I have to take the screens out again and reinstall. The weather here is getting warmer daily, so should be done in the next few weeks.
Hi Guys, just reading your posts on the 911, I have to remove and replace the front and rear screens, is there anything that I would have to do to make for not breaking the glass, and are new rubbers available?
thanks Peter
Hi Peter, you can buy new seals no problem. Not that dear. I would just cut the old seals off, lift the glass out and start with new stuff. Watch the ally trim doesn’t bend too much!
Cheers, JG
Thanks JG, was worried about doing the job but ok now , great help and excellent thing you got here
cheers
Peter
Hi GJ,
What is the availability of a genuine rear rubber for the 911, I have one after market(americian) it has no heater demister holes for the wire, My customer has totally redone the car and just wanted it to look authentic.
thanks Peter
You make the holes yourself, mate 😉
thanks john