
by John Glynn | Mar 13, 2010 | Classic Porsche Blog, Project Cars
I’ve had a longhood Porsche 911 T for a while now and have been to and fro on selling it or keeping it. My business plans for the next two years leave almost no project time, so I’m getting close to selling and letting someone else have the fun of building it up.
A friend of mine is looking at building a period competition car and has been in search of inspiration. It seems to me that a good way to go with the RS-arched T would be towards a Carrera RS, an ST or Le Mans GT category car, like the version successfully raced by Porsche devotees Raymond Touroul and Andre Anselme at Le Mans in 1971.
I know Touroul’s was white, but I would keep the Gemini Blue base and apply some wild race paint – like the Audemars car we all drooled over at the 2008 Classic Le Mans.
")
I love the look of short wheelbase 911s but, as Paul Frere rightly points out, the long wheelbase B series has always been a much better proposition for competition tuning. My car, a ’71 T, has a 2.2E engine in unknown fettle but with MFI and allegedly rebuilt not long ago. That is a nice base to start with. Alternatively, the rules also allow carbs to be used, so it could run Weber 46s. OK, neither way is easy or cheap but with 10.3 compression it’s pretty hot.
The engine would be the dearest part of the work. Some bits can go but some can stay and that helps keep costs manageable. The cars used by Larousse and Waldegard to 1-2 the 1970 Tour de France are another inspiration, particularly as they are/were punchy but mega light (250/260 bhp in under 800 kilos) with plastic front ends. I love these pics by Larousse himself (borrowed from the Sportcar Racing Website). Again I think Gemini with silver, green and purple Tour de France-type graphics would look top notch.
Suspension and brakes were relatively standard on these cars and to be honest I have no idea what is fitted to mine but the underpinnings are pretty easy to come by. That is another plus.
I would get the 7s and 9s the car needs to look right made by Harvey out in the US – I prefer Fuchs to the Fuchs front/Minilite rear looks most people use. Although the famous ‘sunroof ST’ is rather gorgeous.
The only problem with pics of the Sunroof ST and the also very famous French ST (below) is that they are both superb colours! It’s tough not to rip all the Gemini paint off and go with them. That said, if you are taking off RS arches and welding on ST versions, then the paint is coming off anyway.

I think it’s worth going to town on stiffening the shell as much as possible, with seam welding and a welded cage (like Lex’s car below), but I think it is probably possible to build a nice car for sensible money and then go have some fun. Thanks to working my butt off on freelance jobs since the recession kicked in, my hobby finances are in ever-improving shape, so I may yet do the job myself.
We’ve moved the car to Racing Restorations workshop now, so I guess it’s time to go look at Gemini and get a proper idea of what is possible. And how much it’s going to cost.

by John Glynn | Feb 10, 2010 | Classic Porsche Blog, Project Cars
I love Fuchs wheels. No other alloy wheel suits a Porsche 911 like the classic lightweight Fuchs forged alloy rim. Smooth and simple, it neither overpowers the classic 911 shape nor underdelivers in its visual impact. A Fuchs rim is the perfect Porsche wheel, so remember that the word is pronounced ‘Fooks’ and is the same whether single or plural.
I have a few Fuchs in my collection now. Nothing outrageously wide, just the regular stuff in 15″ and 16″ diameter. I have tried some of the UK Fuchs refurbers, which has worked out OK but never really stunning. So there was only one man to talk to about a set of 15″ Fuchs for my orange Carrera 3.0, in 7″ and 8″ rim widths, done in the classic RSR finish. That man is Harvey Weidman in Oroville, California. This is his anodised RSR finish on a pair of 9×15 Fuchs:

Harvey is a 911 fan. His Martini 911 (below, shot by Bob Tilton) is a regular on R Gruppe events in Northern California, and his laid back style and late night car park conversation is a real crowd puller. Well, it pulls me anyway.

Weidman’s Wheels have been playing with Fuchs since Moses was a boy. Harvey tells some great stories of ordering the rarest rims brand new from PCNA many moons ago, at prices to make us weep today. Suffice to say that if Harvey doesn’t know it about Fuchs wheels, then nobody does.
I bought a few sets of 15s in the States last year and not all of them were immaculate. I recently pieced together some RSR candidates by way of a set of 7s and 8s, and sent them to Harvey via some helpful Norcal buddies who were headed up to drop some rims, shoot the breeze and take some pics. They came back with a few cool shots, which I thought might be nice to share. The first is of some uber cool Ronal rims for a widebody project one of the guys is working on. Love these babies:

Here you can see just how wide we are talking! The hunt is on for the centre gaskets on these.

Here’s the Ronals in use on one of the Belga cars from Ypres 1985. Look at the width!

Next is a rim being altered for a buddy running a very widebody 911 RSR down in Southern Callifornia. Playing with rim widths and offsets is a Weidman speciality; not heard of a fail myself yet.

Finally, here’s some RS Carrera wheels that have just been finished in the original green. Note the perfectly sized template for the mounting face under the bench – we don’t want paint in between the wheel and the hub. Amazing how many refurbishment ‘experts’ get this wrong:


Needless to say, I’m looking forward to seeing the finished products in a few months’ time. The Carrera 3.0 is a special little car and Fuchs are special rims. The combination of 15s, Continental Orange 911 and Harvey’s stylish hands should be pretty amazing stuff. More pics as we get them!
Contact details for Weidman’s Wheels are below. If you like Fuchs like I like Fuchs, then it’s well worth getting in touch. Harvey also refurbs Minilites (tricky things to do right) and magnesium centrelock wheels.
Weidman’s Wheels
1675 Wyandotte Avenue
Oroville, CA 95966
(530) 534-7903
by John Glynn | Jan 3, 2010 | Classic Porsche Blog, Project Cars
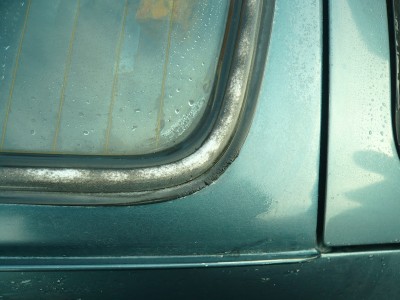
I’m changing the rear window/windscreen seal on my 1983 Porsche 91 SC Coupe. My last post left off at the point where I was just gearing up to take the rear screen out to replace the seal. This was the first time I had changed a rear screen seal in a 911 and it was interesting how it was all assembled. Here’s a shot of the old seal. Note the cracking and the lack of pooling in the corner: the water is running in instead of being held outside. Note also the interior condensation!
Having broken a 924 and a 944 for parts, I know how they are put together. I think the 24/44 series are tremendously heavy machines for what they are. When you start taking a 911 apart, the difference in construction is really obvious: FAR fewer heavy parts, and the parts that matter are really well thought out. The rear windscreen is one of those parts. “Glass is glass”, you might say. Not so, my friends.
Here’s a picture of how the headlining is held in tension at the lower rear corners. Simple, elegant and good for almost 30 years. Note the lack of a leak from the quarter glass. On original seals! Impressive. The other side has a tiny weep so I am changing that.

Taking the screen out is easy enough. It was freezing in the UK, so taking out the aluminium trim with the glass in situ was a bad idea with the rubber so cold – just asking for it to be bent. I decided to cut the screen rubber on the inside and push the glass out.
This is a pic of my first corner – you can see where I am slicing it. You need a sharp blade and a steady hand to keep your headlining intact. I went right around it taking care not to hit the headlining or the wires that run up either side of the glass, inside the rubber.

Rubber out, you can see how ‘in bits’ the rest of the car is. The trim is all out as I type this – nothing left in apart from the rear seatwell covers and I’m taking those out to check for rot.

Pulling out the sound deadening mat showed just what great condition the parcel shelf is in, no rot anywhere (unlike so many RHD UK cars). Here you can also see the DumDum sealing compound that Hayden explained to me last time we met. The compound is there to take up some of the slack in the corners, and support the rubber up top. Using a heat gun, I took the old stuff out and cleaned the old seal marks off the panel with Scotchbrite and thinners. I then replaced the DumDum with new.

Believe it or not, it took me about four hours to get the new seal fitted to the glass! I don’t have any pics of that to share but it went in a treat – with a little help from my faithful drag biking neighbour. Apart from the fact that a 30mm section of ally trim has popped out and refuses to go back in. I think I’ll have to take the screen out again to sort it.
The one consolation is that the new seal is doing its job – see below. I’d call that a result. Note just how much wider the fresh rubber is!


by John Glynn | Jan 2, 2010 | Classic Porsche Blog, Project Cars
The blog has been fairly quiet online over Christmas but I’ve been paddling away hard unseen. Despite the freezing weather, I took the opportunity of the wonderful few days off to get stuck into the Varmint SC. All these days later, I fell like very little has been accomplished but the pains in my body say otherwise! I’m sure I’ve managed to do quite a bit.
The first jobs were to change the gas rams on the bonnet and engine cover, and strip out the redundant alarm that had gone off in a car park in the States, only silenced by Jamie stamping on the passenger’s footwell. We still have no idea what that was about! The ‘Ungo’ alarm module was in the right rear corner of the lugage compartment, so it was time to take some vent tubes out.
The wiring to the alarm was really shoddy, with wires wound together: no solder, no crimps and no tape. It was good to start undoing the disaster. I kept going with the stereo wiring, which was similarly rough:
")
I took a lot of useless wiring out and was very satisfied. So satisfied, I decided to keep going and change the broken aerial. Easiest way to do that was to drop the door off:
")
The aerial went well: a new Hella replacement slotted straight in. I refitted the door, and fancied a drive so connected up the heat on the driver’s side and took the car out to get some fuel. On the way back, I ran it over to meet the Orange.
")
Next morning, it was time to get stuck into something else. I began removing the ever-dampening trim, to find the source of the leaks that were letting in the weather. The front screen seal was one problem area, rather amusingly leaking into the glovebox. Saves it leaking on to the carpet:
")
I changed the seal and took lots of pics. They’re on another computer so more of that anon. With the front done, it was time to look in the back. I started pulling out the rear trim, hoovering out the old dog hair as I went along. It was the first time I really took to appreciate the colour of the blue carpets. I have to say, I am now a big fan of this colour and think it would go pretty well with Orange. After a few hours, the car looked like this:

I found small leaks in the corners of the rear screen and the rearmost corner of the nearside rear quarter window. I’ll tell you what I did about those tomorrow.

by John Glynn | Dec 16, 2009 | Classic Porsche Blog, Project Cars
I won some Cibie Oscar spotlamps on eBay at the weekend and they arrived today. They were last used on a Cortina GT rally car and are absolutely MINT! I am over the moon with them.
Back in my day, Cibies were the lights you wanted on your car, as all the rally boys had them and they were built from melted battleships. Old car lights were about as much use as that Pneumatic Price woman is today, so anything you could do to improve their effectiveness was good news. Cibies were the dearest and the best: my dad had two sets of dealer-fit lamps on his BMW.

My new Oscars are not too big and will be a great addition to the front end of one of my cars. I was going to put them on Varmint but I am leaning more towards Orange now – these are that good.

I mocked up one bumper-mount placement today: am thinking very slightly right and a little more forward. They will come down at least an inch when mounted: sitting on the fixing bolts here. I just love the way these look, and am excited by the prospect of driving into daylight at night, with some new megabulbs en route for all the lights on whatever car they make it to. I can’t wait to fit them over Christmas.

by John Glynn | Dec 9, 2009 | Classic Porsche Blog, Project Cars
Having dropped my cargo at the LA shippers responsible for shipping my Porsche 911 from the US to the UK on October 5th, we flew back to the UK and waited for more info. On the October 16, I got an email to say that the car would sail to Tilbury via the Dominican Republic on the 31st: Halloween. That is when the tracking started and you have read those posts by now.
My last mention of the car on the blog was the pics of the Sormiou in Rotterdam. The ship stayed for a day and a bit, before sailing for London on the Saturday. It made the UK quickly enough, but then anchored off Harwich overnight – I guess the dockers do not work overtime at weekends. On Sunday it sailed up the Thames and docked at Tilbury (pic). The Varmint had landed!
I was off work all that week, so got stuck into putting some projects to bed before the 911 came home. I put the little Land Cruiser back together and that is now MOTed and legal (pic), just about to transfer the numberplate off it and it will then be sold. The Corrado is sold and is about to go.

I had been chasing Kingstown Shipping about paying the duty while the car was on the sea, so I could have it ready to be picked up as soon as it arrived. In the end, I didn’t get a VAT bill until the Wednesday, and the car did not unload at Chatham until the Thursday, so it looked like I wasn’t going to have it home before the weekend.
Kingstown said that they couldn’t have sent me the bill any earlier, as they had to wait until the car had actually landed in the UK and gone on to the Customs website. Once I knew that I was a bit happier; communication is where it’s at, but there are no FAQs anywhere about this stuff. In the end, Kingstown released the Porsche to me before the VAT transfer cleared, so last Friday I drove to Chatham Freight Station and picked it up.

I was a little nervy walking across the floor to the car, but it all looked the same and started first time. I was smiling ear to ear. Doug’s guys had done a great job packing it up and I will definitely use them again. Varmint had brought some California sunshine with it – it was a really beautiful day – so I drove it out front and strapped it to my A-frame, ready for the ride home and the next step of its great European adventure.

")
")


")
")
")
")
")


